Thursday, November 17, 2011

Another One for the Till


Finished this panel saw shortly after finishing the 19" tenon saw. Thought I'd just do a short post with a few pictures. This one has a 22" saw plate, .032 thick, filed rip at 8 ppi. Rake angle of about 5* relaxed. No fleam on this one. The handle is beech. I filed the first 2" at the toe at 12 ppi in hope that this would make it easier to start. I think in theory it was a good idea, but I should've filed it this way for maybe the first 4" or so. The 2" just isn't enough to really get it started, at least not in my few test cuts I made. Built this one for when I want a cleaner cut in 3/4" stuff than what my D-8 5ppi could give me, and for rips in stuff thinner than 3/4 stock. Again, all I've done is a few test rips in 3/4 pine, but so far so good.

Monday, November 14, 2011

A Good Weekend

This past Saturday, the newly formed Chesapeake Chapter of the Society of American Period Furniture Makers (SAPFM) held it's second meeting in Harrisburg, Pennsylvania. As this chapter has members from a wide geographic area, we try to have meetings in a variety of locations as to try to be fair to everyone. This meeting was quite some distance from my house; more than a three hour drive, but the first meeting was so good that I really didn't want to miss the second. It did not disappoint.

The meeting started out with a little bit of chapter business and then it was on the the fun stuff. Member Fred Walker (chapter coordinator) had graciously offered to tutor members on building a Chippendale side chair and he was first up, discussing the style and construction techniques of the chair. I can't imagine too many people knowing more about these chairs than Fred. Mark Maleski (secretary/treasurer) then showed his progress on the chair that he was building under Fred's tutelage and discussed what he'd learned and his failures and successes. Impressive stuff to say the least.

Next up was show and tell, one of my favorite parts, where members can bring in things they've built or are in the process of building. There was a beautifully constructed 18th century style tea caddy, a stunning tiger maple keepsake box, and my personal favorite, a 17th century style joined stool ala Peter Follansbee/Jennie Alexander. I brought my new tool chest, Seaton chest inspired firmer chisels, 18th century style tenon saw, cross cut and rip panel saws (more on the rip panel saw in a future post). Judging by the number of questions I received, there seems to quite a bit of interest in tool making. Obviously, it's something that I thoroughly enjoy.

Then came our featured speaker for the meeting, Chuck Bender of the Acanthus Workshop. Chuck is a master craftsman who has been building period furniture for over 30 years. In 2007 he started the Acanthus Workshop where he teaches a variety of classes to all skill level of woodworkers. The title of his presentation was The Good/Bad/Ugly-Design and Construction. One of the main objectives of the talk was to get us to recognize good design from bad. Chuck had put together a wonderful slide show featuring some beautiful period pieces, as well as some that just didn't quite measure up. This was an effective presentation as it really gave you a chance to see what visually worked on these pieces and what just did not, using not some golden rule formula, but just your natural sense of proportion and what looked right to the eye. I said earlier that I couldn't imagine too many people knowing more about Chippendale chairs than Fred Walker, well I'd say Chuck is one of those few who knows at least as much.

In addition to all this, the members of this chapter are fantastic. Just to name two, at this meeting were blogger's extraordinaire Kari Hultman of The Village Carpenter blog and Shannon Rogers of The Renaissance Woodworker blog and The Hand Tool School. I had the opportunity to talk to both quite extensively and they are both great people. Kari is one of the most passionate woodworkers you'll ever meet and so talented in so many areas of woodworking. And she shares my love of toolmaking. :) Shannon educated me on different varieties of furniture wood and answered all my questions about the different varieties of mahogany on the market. He knows a LOT about lumber. (He works at McIlvain's Lumber)

I'm so glad that I was able to attend this meeting. It was well worth the drive. Although our chapter is in it's infancy, it's off to a wonderful start. Our first meeting's feature speaker was Kaare Loftheim, journeyman cabinet maker at Colonial Williamsburg. Kaare is one of my favorite people to learn from. He is knowledgable, talented, and has a wonderful sense of humor that make his presentations a lot of fun. Our third meeting is already set to take place at McIlvain Lumber in the Baltimore suburbs with Don Williams scheduled to be our featured guest. Don is the Senior Furniture Conservator at the Smithsonian Institution's Center for Materials Research and Education. Don is a master at furniture refinishing amongst other things. He is the mastermind behind the Andre Roubo translation project and author of the upcoming book about H.O. Studley, of the famous Studley tool chest. Not a bad first three featured presenters! Thanks to Bert Bleckwenn (Chapter President) and all others who give of their time to make our meetings great. I encourage anyone interested in furniture making (or tool making) to come to our next meeting and check things out. You won't be disappointed.

Tuesday, November 8, 2011

Testing the New Tenon Saw

Well, my impatience got the best of me as I thought it would and I set the teeth on the new tenon saw last night using my old triumph saw set. It's actually not a bad tool. I think I just need to get used to it, and get used to setting teeth in general. I am a novice at saw sharpening.

That being said, I decided to use a trick that I just saw posted on Chris Schwarz's Popular Woodworking Blog. It's a video of Mike Wenzloff showing a trick that his grandfather taught him. Basically, you intentionally overset the saw slightly and then wrap a piece of paper around the saw plate and squeeze the teeth in a smooth jawed vise, like a machinist vise. The teeth punch through the paper, but the paper doesn't compress on the plate above the teeth, leaving you with a consistent set on each side of the plate the thickness of the paper you used. Actually, at least in my case, a little more set than the thickness of the paper. I'm a little guy and I don't achieve quite the foot pounds of pressure that Mike does. ;)

I set the saw at home last night and then took it to work today where I have access to a machinist vise. I first used a sheet of legal paper and this left a little more set than I wanted. Then I switched to a sheet of newspaper and this was just the trick. The saw plate is .025 and the teeth after the vise squeeze mic out at .035. So .005 of set on either side. Right or wrong, this is what I was aiming for.


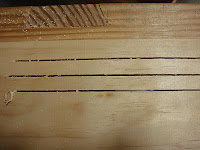
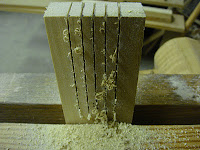
I put the saw to the test tonight. First I made some cheek cuts in a piece of 2 1/2" wide polar. Ate right through it like butter, nice and straight. Next I put a piece of poplar in the vise with the face toward me and tried to track some lines. The saw did well but turned slightly left on the last stroke or so on some but not all of the lines. Could've been my sawing skills, I'm not sure. What I do know is the saw cuts very quickly with no effort. That heavy brass back really propels it through the wood. 7 strokes and I was to the max depth of the saw. The cuts were a little ragged on the back side so I hit the saw with a couple strokes of the file with just a slight, maybe 5*, bit of fleam and made some more cuts. That little bit of fleam smoothed things out a bit. Less ragged on the back side and no loss of speed so I think I'll keep it at that.


Backside before fleam . . . . . . . . . . . . . Backside after fleam

I'm happy with the look and feel of this saw and based on the test cuts I think I'll be pleased with the performance as well. I really think that the Mike Wenzloff trick is a great thing for someone inexperienced with setting saw teeth. I highly recommend you try it. I know it really helped me. And if it's good enough for Mike Wenzloff. . . . . .

Next up, I'm finishing a 22" rip filed panel saw build. Wasn't I supposed to be starting on a blanket chest? Dang.

Sunday, November 6, 2011

Brute of a Tenon Saw


Got this tenon saw pretty much finished the other night. All done except for setting the teeth. I tried to pattern the handle after the tenon saw in the Seaton Chest, while the saw plate size I got from an illustration in Smith's Key. The handle feels really good in my hand and I was happy with the way it turned out; until I took pictures and looked at them. It was then that I realized that I took a little too much out of the handle opening at the top leaving things just a bit thin at the top in front of the horn. I think the picture actually makes it look thinner than it is, but I think I'll try to leave more meat there on the next saw. Don't foresee a problem functionally, just aesthetically.


The saw plate is a piece of 1095 spring steel from McMaster-Carr, sized and shaped on a sheet metal shear at work. Cut the teeth in by hand with saw files. The back is a folded brass back that I purchased from Mike Wenzloff. One inch wide and in excess of a quarter inch thick. A hefty hunk of brass to say the least. Well worth the price to me as I have no good way to bend metal this thick. The handle is quarter sawn, well, more like rift sawn, beech.


Vital saw stats: 19" long saw plate. 3 9/16" depth under the spine at the handle, 3 1/16" at the toe. Teeth are 9 ppi, filed rip with about an 8-10* rake angle. Saw weighs in at a hefty 2 pound 5 ounces. I think with the heft of this brass back, it's just going to be a matter of getting it started on the line and then just let 'er eat.

I haven't set the teeth yet because I'm looking for a 42X saw set to try out. If I get impatient before I find one, I'll just use my old Triumph set.

Once I get the teeth set, I'll post some in action pictures and give a report on how this beast preforms.