Saturday, May 29, 2010

First attempt at saw making


Well, here's my first saw build, complete except for the teeth. I actually made the blade for this about 6 months ago but just got around to making the handle this past week.

The saw plate is from a sheet of .018 1095 spring steel from McMaster-Carr. The steel comes with a blued finish which you could leave on if you wanted, I chose to sand it off and have a bright saw plate. I wanted this saw to have the look of an 18th century saw so when I cut the saw plate, I canted it, 1 5/8" at the toe, 1 7/8" at the heel. I did this with a floor model metal sheer. I chose a steel back for this saw instead of brass. It started out as a piece of 3/4" angle iron from Lowes. I slowly and carefully bent this closed in a machinist vise, moving it in slow increments from side to side being careful not to kink or bend the back crooked. This is the hardest part of the whole process. Once I got it bent closed, I shaped it, filed the imperfections out of it, and then sanded the file marks out. Then it was time to install the saw plate. I started with the saw back on the bench and the top heel corner of the saw plate inserted in the rear of the saw back at 90 degrees to it. I tapped that corner in and then worked my way toward the toe, tapping it down into the back as I went. The useable depth under the back is 1 1/8" at the toe and 1 3/8" at the handle.

The handle is black walnut and the shape is modeled after the Wenzloff Early Kenyon Saw. Made a paper pattern and attached it to the walnut with a glue stick, cut the handle to rough shape with a coping saw, then lots of work with a couple of rasp and a chisel, followed by progressively finer grades of sand paper. The finish is four coats of wipe on clear satin poly. Stumbled across the hardware at a True Value. Not sure what they're supposed to be used for, but they work pretty well as saw nuts. And less than a dollar a piece. Now I just have to find to nerve to cut the teeth. Trying to decide between 15 and 17 PPI.

This project has been a lot of fun and I'll definitely do some more. Really want to make a copy of the Tenon Saw shown in Smiths Key.

Thursday, May 27, 2010

Striking Knives


Here are some striking knives I made a few months back. All are made from a piece of 1/8" thick w-1 tool steel, 1" wide by 36" long, purchased from McMaster Carr. I made the three shiny ones first. Cut the steel into three 9 1/2" lengths, put masking tape on the face of each, and drew the outline of the striking knives on the tape. Cut the outline just shy of the line with a hack saw and finished them up with a half round bastard file and a flat mill file. Formed the 25 degree bevel with the file, but not all the way to a sharp edge; left about a 1/32" flat on the bevel so the edge wouldn't distort during the heat treating process. The finger cut-outs on the two were just made with the half round file. I find these to be very comfortable in the hand. The awl end was made by chamfering the edges with a file and then working them to round. The point was finalized on sandpaper stuck to a table.

Next came the heat treating to get them hard enough to hold a nice, durable edge. I heated the metal with a plumbers torch with mapp gas, which burns hotter than propane. I laid the metal on a bed of charcoal as to not let the heat dissipate so quickly. First step was to bring the metal to the "critical point" of approximately 1500 degrees fahrenheit. The metal becomes non-magnetic at this temperature, and that is how I determined when I had hit the appropriate temp. Once this level of heat is achieved and held for about 20 seconds, I quenched the metal in a coffee can filled with water. At this point the metal is extremely hard; way to hard to use. It is very brittle and too hard to be honed on sharpening stones. So the next step is to temper them to a useable hardness. I was shooting for somewhere around RC 60 or so. To achieve this hardness, I place the knives in a 425 degree toaster oven for about 45 minutes. This brings the metal to a nice straw color, which helps tell you that you're where you want to be hardness wise. I then polished them to a bright finish with progressively finer grits of sandpaper, the final, a wet-sand to bring them to a nice polish. Then a final sharpening on my oilstones to finish the shape of the bevel and give them their final honing.

The two shorter knives were made with the left-over length of metal I had. These were inspired by the striking knives that the blacksmiths at Colonial Williamsburg make for the cabinet makers and jointers. The process was the same for heat treating them. The twist in the middle was done by heating the metal cherry red and holding one end with a pair of vise grips and grabbing the other end with an adjustable wrench and twisting while still cherry. I put a point on the end of one of the knives and a tiny knife edge on the end of the other. On all five knives, only the bevel end was heat treated. The awl end was left soft so it can be easily shaped with a file or sandpaper.

Wednesday, May 26, 2010

Workbench Complete!


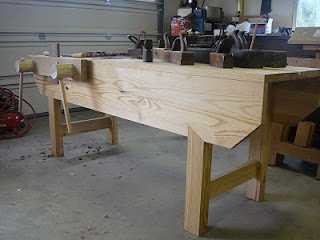
Completed my Nicholson bench yesterday. Drilled 3/4" holes in the front apron and top for holdfast. This was done with a 10" swing brace and a 3/4" Jennings auger bit. Installed a 2" square planing stop on the left side of the bench top. Mortised the hole in the top by marking out the area, drilling four 1" holes, and then squaring up the hole with chisels and rasps. I've been very happy with the bench initially. Seems very stable. No racking or movement when planing. I'm guessing that the wide front apron adds a lot of stability. May add a bottom shelf eventually, I'll see how it goes.

Tuesday, May 18, 2010

New Tool


Received a new (old, but new to me) tool in the mail today from Hertfordshire, England. It's a Marples inch and a quarter tapered reamer that I won on eBay. I was very pleased with the quality of this tool. Nice tight handle with no cracks and really nice steel.Seems pretty sharp too. I hope to put it to use soon in reaming the seat board holes to accept the legs of a shave horse I've been wanting to build. It'll also come in handy if I ever get the chance to tackle Windsor Chairs.

Monday, May 17, 2010

Workbench in Progress


Finally got a chance to finish making my twin screw vise for my Nicholson Bench and got it installed today. I'm pretty excited to get it done as I've been dealing with health issues the last couple months and haven't been up to any woodworking. It was good to get back to it. The bench had been sitting untouched since around December.

The bench is made of southern yellow pine and the vise chop out of a thick slab of red oak I had lying around the shop. The vise screws are inch and a half dowels that I threaded with a Beall wood threading kit. They work well, and I like the idea of wooden screws vs. metal. Just a traditionalist thing. No garters on the screws. I don't think I'll need them. I'll just manually pull out the vise chop after unscrewing the screws a few turns. And I can remove the vise entirely if it gets in the way of stock prep on the bench top.

I still have a little work to do on the bench. I want to drill holes in the front apron and a few in the top for hold fast. And I want to add a wooden bench stop at the left end. Hopefully soon. The tools on the bench in the photos have nothing particular to do with the construction of the bench, but the bench just looked so empty without anything on it. And I just can't resist pictures of tool porn. ;)

Jamie Bacon